Published: Feb 14, 2020 by Tariq Hawis
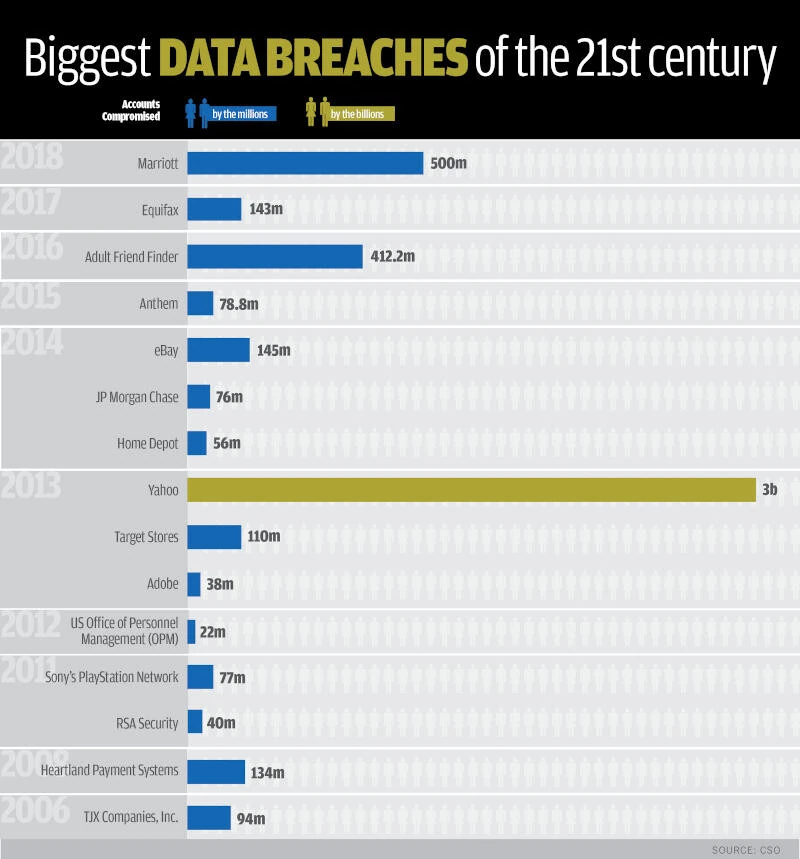
Back in the day, people had no concern about having a secure website. It was not until security flaws in the websites become frequent and the largest companies in the world had reported millions of account breaches.
Today, almost every website owner is aware of web attacks and the existence of hackers as a threat to their websites.
So what caused all this chaos?
If you dig down to the details of these enormous breaches, you will find that it started with an injection vulnerability, one of the most common web vulnerabilities used is SQL Injection which allows the intruder to reach the website’s database to extract the stored data, like users’ accounts.
These repeated web incidents have made a bad reputation to the dynamic websites, but then it raised the need for alternative techniques, and here when Static Sites Generators come from.
What is Static Sites Generators
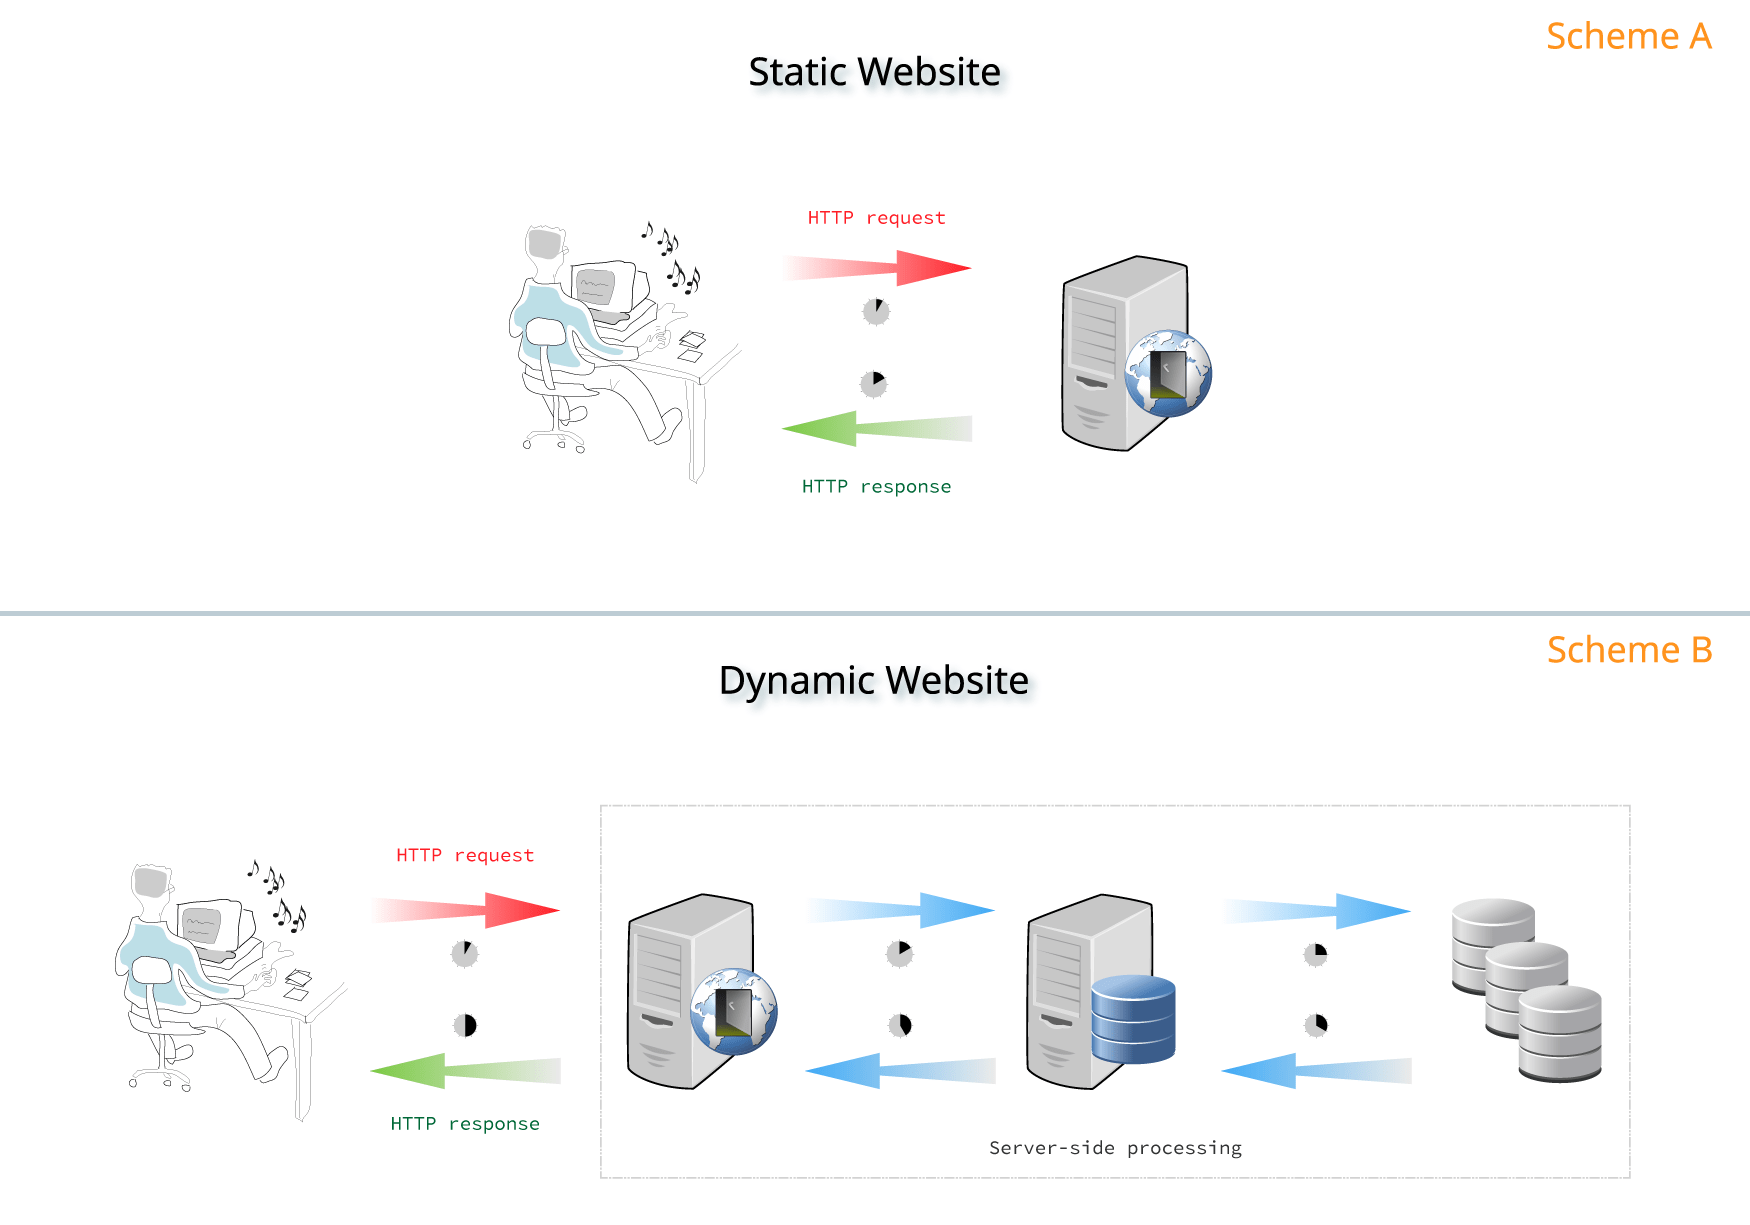
SSG is a new, hybrid approach to web development that allows you to build a powerful, server-based website locally on your computer but pre-builds the site into static files for deployment.
This modern approach has become the best alternative to a dynamic website that has all sorts of programming variables, functions, classes, database calls that increase the potential vulnerabilities in your website.
 (source: gitlab)
This difference is giving static websites many advantages over dynamic ones, in terms of security, speed, cost, and scalability.
1. Security
Unlike dynamic websites, there is no data inputs that need to be validated, or database calls, so no way for command injections.
2. Speed
The static site is fast, the website is already made of HTML, no PHP file to compile or database queries, so there is nothing to process from the server-side.
3. Cost
It is also very cheap, you will only pay few bucks in a year if you run it on a service like Amazon S3
4. Scalability
While with dynamic sites it’s common to have unexpected traffic peaks that crash your site. This is unlikely the case with static sites that has a low load on the server.
How to Build a Static Site?
There are many modern Generators become available, the most commons are Jekyll, Next, Hugo, Gatsby, and Hexo. So you pick one of those generators which will take care of the coding stuff and let you focus on your content only.
 source: jekyllrb.com
I prefer Jekyll for many reasons. First, it has an active community, which means if you have faced any issue with your site, rest assure that you can find someone who can help. Second, it’s the one that established many of the patterns that other SSGs are now using, from metadata in front matter and structured data folders, to support for Markdown, expressive Liquid templating, and support for categories and tags.
So let’s build our first Jekyll blog.
The steps will be first building your blog on your machine, and once you customize it as you want it to be, you can deploy the _site folder to the hosting space.
To setup your Jekyll environment, you’ll need to install Ruby which is the language that Jekyll is built on and install bundler which will help you manage your project dependencies, and finally Jekyll itself.
The instructions may vary depending on your operating system. For Linux users, you can follow these steps down below:
1- Open your terminal and run this command:
sudo apt install ruby-full build-essential zlib1g-dev
Wait a few seconds for apt to install Ruby with all its essential libraries.
2- After you get the prompt again, edit bashrc with nano ~/.bashrc, then add the following couple lines at the bottom of the file:
export GEM_HOME="$HOME/gems"
export PATH="$HOME/gems/bin:$PATH"
Save the file by pressing the combination keys “CTRL+O” then “CTRL+x”
3- Back to terminal now, you need to apply the changes on bashrc by running this command
source ~/.bashrc
4-Finally, install Jekyll; You still have terminal open, run this command:
gem install jekyll bundler
That’s it.
For other operating systems “Windows or MacOS”, refer to the jekyll installation guide and choose the same operating system of yours.
Now that you have Jekyll environment settled, it’s time to build your first lovely jekyll blog. First, pick a location where your blog files will be placed on your system, I prefer to be as close to the root as possible, such as /home/$USER/myblog, or for MacOS: /Users/$USER/myblog, now whatever the location you choose, go to that location with cd /home/$USER, and run this command:
jekyll new myblog
Wait for few seconds… Et Voila! You’ve just created a complete Jekyll blog.
At the end of the day, your Jekyll blog has a structure that looks like this:
├── _config.yml
├── _data
|   └── navigation.yml
├── _drafts
|   ├── draft-post1.md
|   └── draft-post2.md
├── _includes
|   ├── footer.html
|   └── header.html
├── _layouts
|   ├── default.html
|   └── post.html
├── _posts
|   ├── yyyy-mm-dd-post-title1.md
|   └── yyyy-mm-dd-post-title2.md
├── _sass
|   ├── _base.scss
|   └── _layout.scss
├── _site
└── index.html
Where:
_config.yml: Stores configuration data
_data: Well-formatted site data should be placed here, such as the navigation items
_drafts: here placed the unpublished posts.
_includes: These are the partials that can be mixed and matched by your layouts and posts to facilitate reuse
_layouts: These are the HTML templates that wrap posts
_posts: Your posts are saved here.
_sass: These are sass partials which will then be processed into a single stylesheet main.css
_site: This is where your generated site will be placed
index.html: Your main page, can also be an ‘index.md’ with front matter
Now to see how your website looks like for your visitors, run the following command to build your site and start a local server as well:
bundle exec jekyll serve
After few seconds, you will see on terminal the last two lines:
Server address: http://127.0.0.1:4000/
Server running... press ctrl-c to stop.
Now open your favorite browser and put this link: http://127.0.0.1:4000, you will see a default page from Jekyll saying welcome to you:
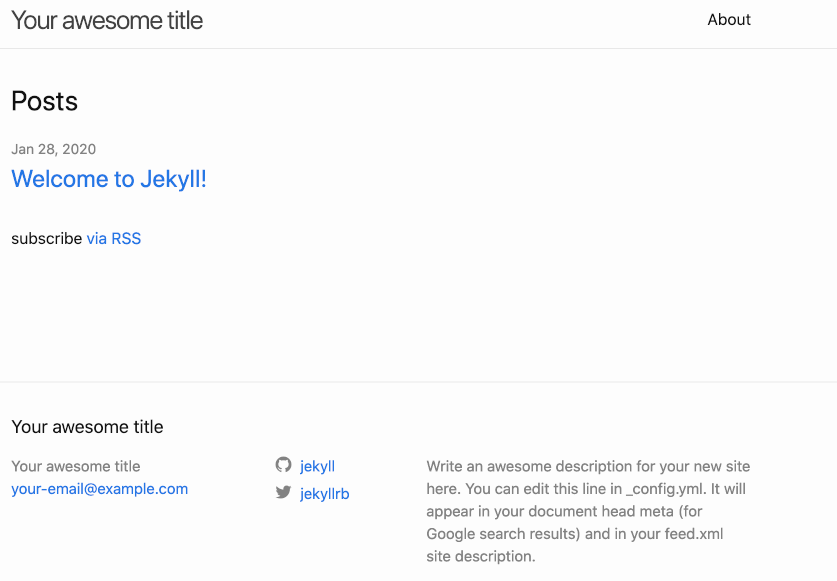
Yes I know, it looks so simple. That’s the look of the default gem-based theme called Minima, there are many themes available on the Internet for Jekyll here are some links:
Installing any theme you like is very easy. Most of the theme creators are providing the instructions for the installation which are pretty same as the following:
-
Edit Gemfile “inside your blog directory”, and add
gem "THEMENAME-jekyll-theme", replace THEMENAME with the name of the theme -
With the terminal opened on the root of your blog directory, run the command
bundle install, which will install the theme and its dependencies. - Next, edit
_config.ymland addtheme: THEMENAME-jekyll-theme, replacing THEMENAME with your theme name, which will setup the theme to your site. - Finally, run
bundle exec jekyll serveto build and serve your site in case it is already running, close it withCTRL+Cand re-run the command to rebuild the site
Now re-check again with http://127.0.0.1:4000 and see your new website’s look.
For further changes to the site, you need to read the documentation at the theme’s website to set things like the navigation, contact form, and social sharing buttons…etc
Deploy your site
Now that you built your website and added your touch, it’s time to make the website available online.
At the time when you executed bundle exec jekyll serve, Jekyll generated your static site to the _site directory inside your blog. You can transfer the contents of this directory to almost any hosting provider to get your site live.
Having a generated static site gives you more hosting options than with the traditional LAMP site. As you can either upload _site to any hosting provider using any file transfer i.e. FTP, or you choose one of the modern web hosting that provides automatic deployment, global CDN, one-click HTTPS in addition to other awesome features for SSGs-based sites. Some of those providers are Aerobatic, Netlify, and AWS Amplify, Find the full list with the features for each one at jekyll Docs
Any Free Options?
If you are looking for a free hosting service especially when your website or business service is in its early stages, but you need a clean website without ads garbage by the provider and have the freedom to point your domain, then the best option for you is the Github’s awesome service called Github Pages.
There are some steps to be followed before you can host your website on Github Pages, which involves creating a repository on your Github account, and initiate git inside your blog so you can push your changes from the local site to the online repository where your blog resides.
Here is a complete guide from Github to setup your Jekyll blog on Github Pages -I followed it myself-
Be Aware of the Common Security Mistakes
So you made up your mind and chose to build a static site, does that makes your website a hack-proof?
I would say no, but you’re almost there!
Even with a static website, you won’t get 100 percent of protection even that you have no user inputs or database in the backend. That is because your jekyll - since it’s a ruby-based framework- depends on gems “the name of ruby libraries” for running. These gems may be got vulnerabilities discovered from time to time and thus your blog would be at the risk of exploiting any of these vulnerabilities. So it is always recommended to keep watch for the last updates of your gems that are specified in your Gemfile and Gemfile.lock. And for that matter, I personally recommend a great bot called snyk which saved me considerable time by checking my installed gems and notifying me of the last bug findings. Awesome right?
All you need to do is to integrate this bot to your GitHub pages and give it the required authorization so it can check and then make a pull request for any discovered bug. For more details refer to Doc at snyk website
That’s it. You now have a robust, yet simple blog website just enough to publish your thoughts.
Stay safe!
If you have any question or any suggestion to point out, why not leave me a comment down below, or send me a message over twitter
Share